Back when I was in High School, I was fortunate enough to be involved in a Vocational Cabinetmaking Program that took part in Student Built Homes. These homes were designed and built with the understanding that students would gain hands on experience in their respective trades.
My Cabinetmaking Instructor was, for lack of a better term, old school. Foul language and off-color jokes were common in the shop and our instructor didn’t pull any punches when it came to constructive criticism. He wanted his students to be good at what they did – simple boxes and boring joinery were not encouraged.
When it came time for my class to design and build the Kitchen in our Student Built Home, he wanted something special. Something that would stand out to potential buyers and impress them. That is how I was introduced to Eyebrow Cabinet Doors and how to build them.
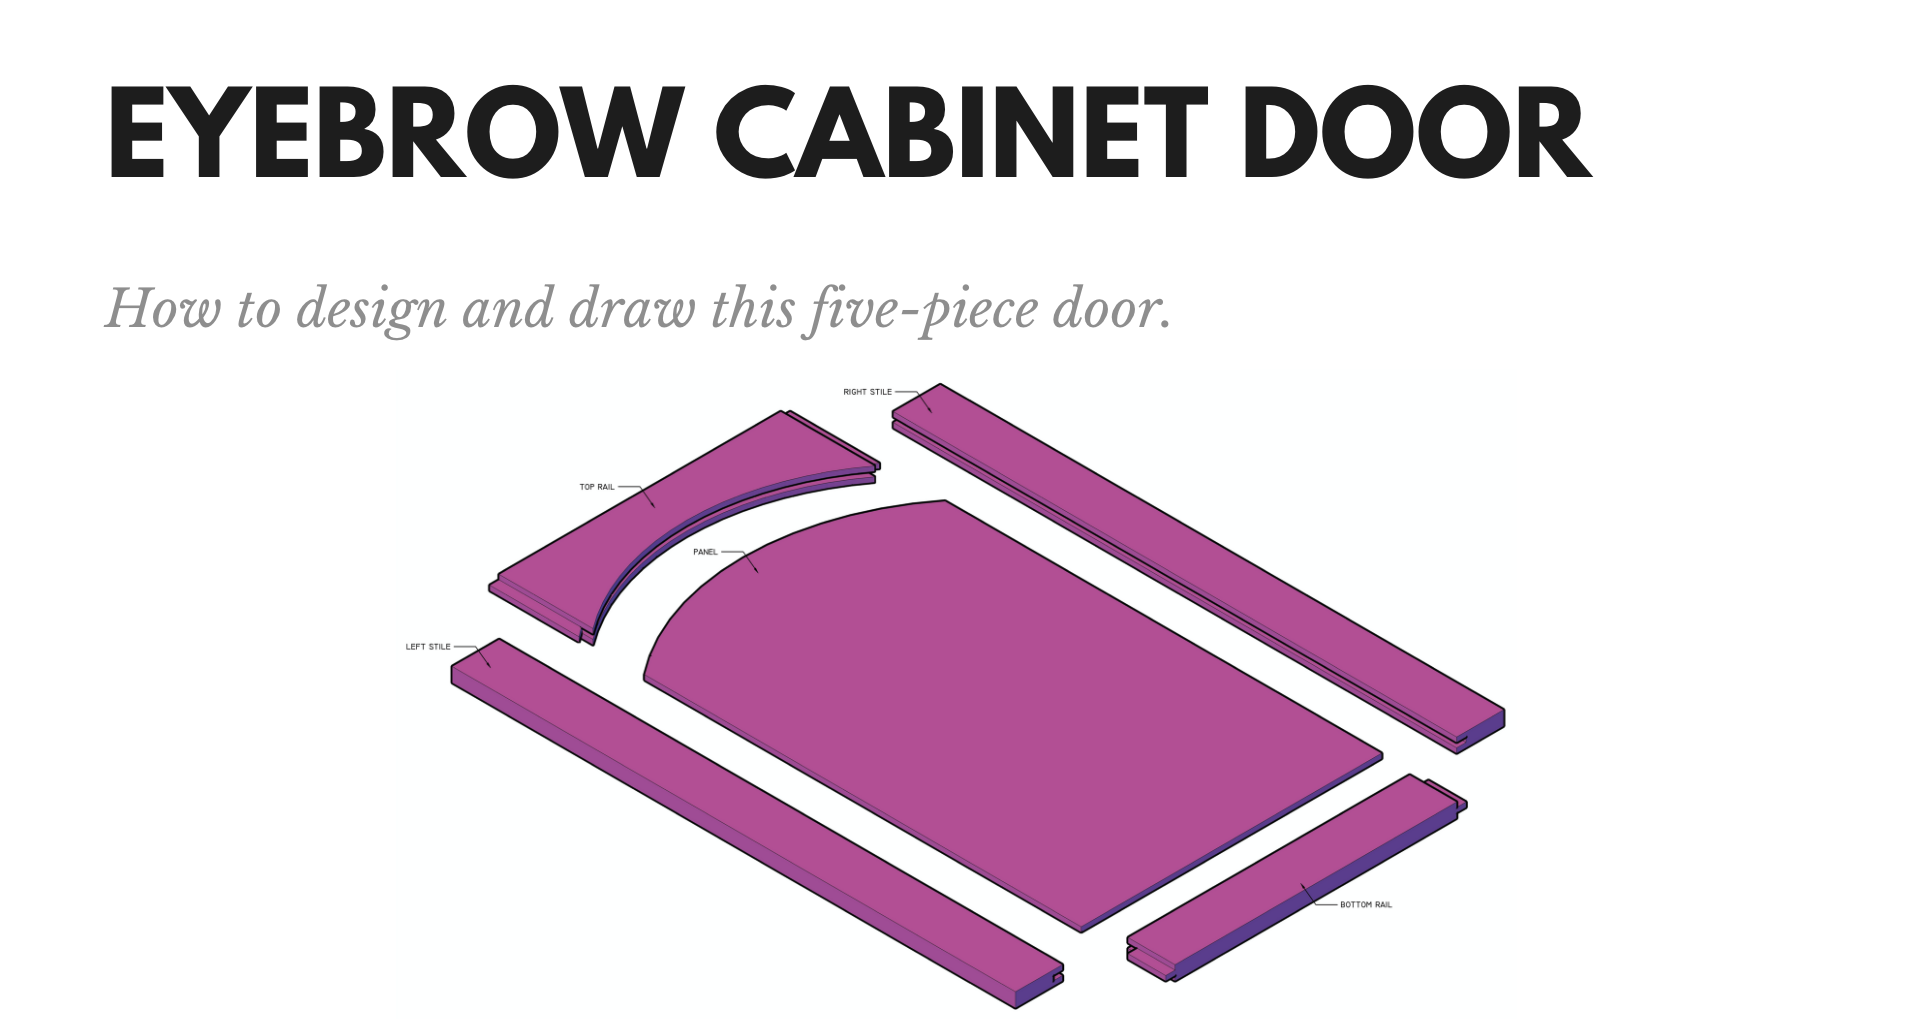
An Eyebrow Cabinet Door is a style of door with a Single Arched Top Rail and Panel. This type of door can utilize both Flat or Raised Panels and may be designed to fit into either a Square or Arched Frame. A variety of materials can be used from Paint Grade MDF to Stain Grade Solid Wood.
Components of an Eyebrow Cabinet Door
Before we get into designing an Eyebrow Cabinet Door, it is important to understand the components. This type of door is typically 5-Piece Construction which means that it utilizes five total components. These components are the Left and Right Stiles, Bottom Rail, Arched Top Rail, and Arched Panel.
Some Door Manufacturers currently offer this door as a solid piece of MDF with the Eyebrow Profile routed into the face. This option is good for low-cost painted cabinetry as the labor cost is substantially less. This option is also less likely to warp or crack at the joints (because there are no joints). We will discuss this style of construction in a future blog post.

Designing the Arched Door
Now that we understand what an Eyebrow Cabinet Door is and the components that go into making one – we can now begin the design process. The simplest design for of this type of door is a single arch in a single door. The design doesn’t have to stop there, however.
In the case of my Student Built Home Kitchen, we designed an entire run of Wall Cabinets with a long – sweeping arch that spanned several doors. In this instance the process was repeated several times to achieve the overall look we were shooting for.
Laying out the Arch
In order to get started we first need to rough out our cabinets – complete with doors. It is one thing to say “I want an arch with a 24″ radius” and it is something else entirely when you see it laid out to scale.
Once our cabinets are roughed out, we can begin to play with different dimensions to see what fits best. I find it best to start by determining the largest and smallest part of my Top Rail – then I’ll strike my arch to see how it all ties together. When we are happy with our layout, we can begin detailing our components.

Detailing the Components
For the sake of simplicity, we are going to design our Eyebrow Cabinet Doors as Shaker Style. This will allow us to focus on the process without getting wrapped up in working out Mortise & Tennon Joints or how a Haunched Profile may affect the detailing.
Once we are happy with the appearance of the arch, we need to accurately draw all of our Stiles and Rails. Once these are in place we can trim away the unneeded sections of the arch. This will create the door and effectively give us the basic shape of the arched top rail and panel.
What we have at this point is good for presentation drawings but it will need to be further detailed for manufacturing. A 1/2″ tongue will need to be added to the Top Rail (this will be straight). With the added half inch, we now have a complete Eyebrow Top Rail.
Rather than offsetting our panel by the same 1/2″ we’re going to undersize it by 1/32″ all the way around. This will create a little slop in the panel so that the door doesn’t have to be beated together or require excessive clamping.

Put it all Together
When the Shop Drawings of your Eyebrow Cabinet Door are complete, you can now move on to making the physical door. Full Size templates can be printed, traced, and parts cut by hand. If you have use of a CNC Router, the geometry for the Arched Top Rail and Panel can be used to generate programs for machine cutting.
We hope that this blog post has simplified the process of Designing an Eyebrow Cabinet Door. If you have any questions about laying out an Eyebrow Cabinet Door, or if you have questions for a future Blog Post – please feel free to leave them in the comment section below and we will do our best to help.
- Millwork Shop Drawings: Training Survey - May 5, 2024
- Optimize Your Shop Drawings: Exploring the Power of theAutoCAD DimSpace Command - December 5, 2023
- The 4 Grades of Kitchen Cabinets: What Does It All Mean? - November 28, 2023


